DCF77
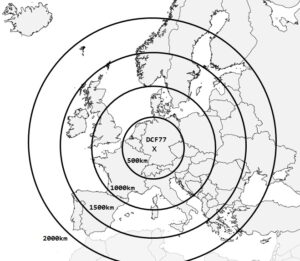 DCF77 refers to a communication protocol that allows the time of a system to be synchronized with that propagated by a radio transmitter near Frankfurt (Germany). The signal is transmitted with the frequency of 77.5 kHz and a power of 50 kW.
On the side we see the range of the signal that reaches 1900 km during the day and 2100 km at night (with better radio signal propagation) (source Wikipedia).
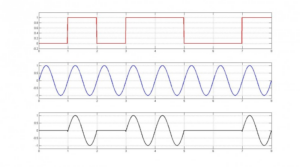 The signal is encoded by modulating the carrier wave with the ASK (Amplitude Shift Keying) method. The first line of the drawing illustrates a series of logic levels representing the bits, the second line is the carrier wave, the third is the amplitude modulated carrier in ASK. This kind of modulation is very sensitive to noise and is no longer used in current equipment. The side drawing is not to scale, in fact the modulation depth varies between 100% and 20%.
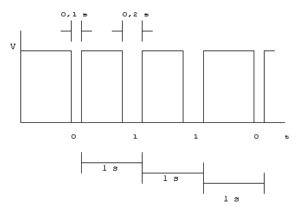 The radio receiver is a very simple circuit composed by a ferrite antenna and an electronic circuit tuned to the transmission frequency of 77.5 kHz. The signal output from the receiver is like shown beside. One bit is transmitted every second: 0.9 seconds high and 0.1 seconds low means bit 0; 0.8 seconds high and 0.2 seconds low means bit 1.
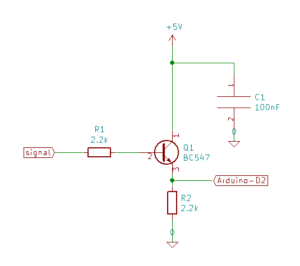
I didn’t buy the radio receiver, but I got it from an old radio controlled electronic clock. The DCF77 output circuit provides a signal with inverted electrical levels, so I had to build an electronic signal inversion and electrical level adaptation circuit, with a bc547 transistor, to condition the signal and thus adapt it to the input of an Arduino nano.
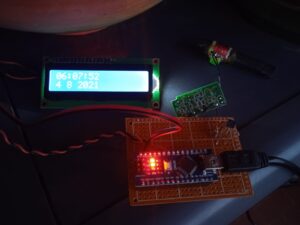
Here is the result after a night of waiting. I put the circuit outside the house towards the north and powered it with a battery.
Now let’s see how the software is structured. Mainly the program uses four libraries:
- DCF77.h, completely manages the noisy signal of the radio receiver by intervening in the reading of the data through the interrupt technique. This library was written by Udo Klein, to lock a signal even when there is a huge amount of noise and interference on the signal and thus allow easy synchronization.
- LiquidCrystal_I2C.h to drive an LCD display.
- Wire.h to communicate with I2C devices.
- Timelib.h instead provides time and date management functionality.
#include "DCF77.h"
#include <TimeLib.h>
#include <Wire.h>
#include <LiquidCrystal_I2C.h>

#define DCF_PIEDINO 2      // Connection pin to the DCF77 radio receiver
#define DCF_INTERRUZIONE 0 // Interruption number associated with the radio reception pi
#define PIEDINO_LED 13     // LED Arduino

int valorePrecedente=0;

// i2c Address, columns, lines of the LCD display
LiquidCrystal_I2C lcd(0x27,16,2);

// creates DCF77 object and attaches interruption number
DCF77 DCF = DCF77(DCF_PIEDINO, DCF_INTERRUZIONE);

// valid signal flag
bool segnaleValido = false;

void setup()
{
      lcd.begin();
      pinMode(PIEDINO_LED, OUTPUT);
      Serial.begin(9600);
      // attiva l'oggetto DCF77
      DCF.Start();
      Serial.println("Waiting for signal from DCF77  ...");
      Serial.println("It may takes at least 2 minutes.");
      lcd.backlight();
      lcd.setCursor(0,0);
      lcd.print("Waiting for signal!");
      lcd.setCursor(0,1);
      lcd.print("2 minutes wait!");
      delay(2000);
      lcd.clear();
}

void loop()
{
      // signal presence interrogation every second
      delay(950);
      digitalWrite(PIEDINO_LED, HIGH);
      delay(50);
      digitalWrite(PIEDINO_LED, LOW);

      // Signal presence test
      time_t DCFtime = DCF.getTime();
      if (DCFtime!=0)
      {
            Serial.println("Updated time");
            setTime(DCFtime);
            segnaleValido = true;
            lcd.clear();
      }

     // Time has been set, the LED lights up briefly
     if (segnaleValido)
     {
           delay(50);
           digitalWrite(PIEDINO_LED, HIGH);
     }
     digitalClockDisplay();
}

void digitalClockDisplay()
{
      //sends the time on serial line
      stampaZeroSeriale(hour());
      Serial.print(":");
      stampaZeroSeriale(minute());
      Serial.print(":");
      stampaZeroSeriale(second());
      Serial.print(" ");
      Serial.print(day());
      Serial.print(" ");
      Serial.print(month());
      Serial.print(" ");
      Serial.print(year());
      Serial.println();
      lcd.setCursor(0,0);
      stampaZeroSerialeLCD(hour());
      // sends the time to the LCD
      lcd.print(":");
      stampaZeroSerialeLCD(minute());
      lcd.print(":");
      stampaZeroSerialeLCD(second());
      lcd.setCursor(0,1);
      lcd.print(day());
      lcd.print(" ");
      lcd.print(month());
      lcd.print(" ");
      lcd.print(year());
}

void stampaZeroSeriale(int cifra)
{
      // adjustment of the field
      if(cifra < 10)
             Serial.print('0');
      Serial.print(cifra);
}
void stampaZeroSerialeLCD(int cifra)
{
      // adjustment of the field
      if(cifra < 10)
            lcd.print('0');
      lcd.print(cifra);
}
![]()
